
Stock is a versatile ingredient that adds flavor to almost any dish and it turns out it’s easy to make! I had stopped using stock because I could only find it in a plastic lined box or can. Then one day I saw a post on Instagram about how easy it was to use left over vegetable scraps to make homemade stock and now, because I have a never ending free supply, I seem to use a pint a week. It can be added to almost any dish, but I mostly use it in soup, stir fry, or stuffing.
Interested in making your own stock? Here’s how I do it:
What you will need:

- Vegetable scraps: Make sure they are clean
(You can also include chicken bones if you want to make chicken stock)
- A crock pot: You can use a pan on a stove top
- A strainer: I use a strainer and a spider ladle
- A bowl
- Containers for storage: I use wide mouth pint jars
Optional: A funnel and ladle
Step 1: Collect Scraps

Every time I cook I keep the left over vegetable pieces and peelings and store them in the freezer until I get enough to fill up my crock pot. You don’t need to fill up an entire pot to make stock, you can make whatever sized batches you want. My brother saves his veggie scraps until he’s ready to make soup, which gives him just enough to use in the soup.
I use everything from the cores of peppers to the ends of zucchini and the peels of broccoli stems. The stock will turn out differently depending on what you use, but to keep it more traditional you can include carrots, celery and onion.
Step 2: Cover with water


Put enough water into your crock pot or sauce pan so that your vegetables are covered.
Vegetables and water are the only things I use to make stock. This is different than the heavily salted versions you will find in your local grocery store. I like having the option to add as much salt as I want to my finished dishes, and having a salt free stock allows me to do so.
Step 3: Simmer

My crock pot never quite gets up to a simmer, so I just turn it on high and let it sit 4-6 hours, though you could leave it longer if you want stronger stock.
If you’re doing this on the stove top, bring the water to a boil then reduce it to a simmer for about an hour.
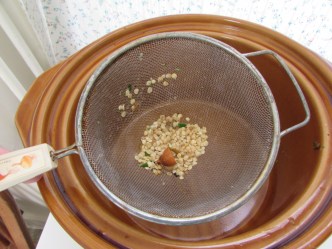
Step 4: Strain it

Once my stock is done simmering, I scoop out all the veggies with a spider ladle (such a creepy name for such a handy tool). Don’t forget to compost the leftover veggies!

Then pour the stock through a strainer.
Step 5: Store your stock
I get about 5-6 pint sized mason jars full of stock for every crock pot of vegetable pieces. In order to store this stock so that I have time to use it, I pour it onto pint sized wide mouth jars and freeze them. I find a funnel and a ladle come in handy here. You can also keep your stock in the refrigerator or can it and keep it on a shelf, depending on how long plan on storing it before using.

If you are going to be freezing it, make sure to use wide mouth jars and leave about an inch at the top of each so that the liquid has room to expand as it freezes.

Step 6: Use!
I always label mine with the date that I made it so that I know when to use it by.
Here’s a handy guide for how long stock can be stored:
In the refrigerator: 1-2 weeks
In the freezer: Up to 6 months
Canned: Up to 2 years


This is really useful- thanks for posting how to do this!
LikeLike
So happy you found it helpful!
LikeLike